
Implementing Cache in Nodejs Using Redis
Optimizing Application Performance with Redis Caching in Node.js


Introduction
Caching is a technique used to speed up the performance of an application by storing frequently accessed data in a temporary location for quick retrieval.
To understand more about what caching is all about, check out my article on Introduction to caching using Redis which gives an overview of what caching is all about.
Many applications today depend on data to operate. This data is usually from the database or from an API. To fetch this data, we send a request to the API server. This request triggers a response from the API server. The time it takes for the server to process the request and send a response is called latency.
Latency in backend development refers to the amount of time it takes for a request to be processed by the server and for a response to be returned to the client.
In this article, we are going to see how to use Redis in a simple Node.js application.
NB: This project is a single-page application. We are not bothered about certain things e.g. folder arrangement, modularization of code, etc as this project aims to introduce the concept of caching using Node.js.
Prerequisites
There are a few prerequisites for setting up Redis on a Node.js application:
Redis server: A Redis server has to be installed and running on the system, or on a remote server that can be connected to. The Redis server can be downloaded from the Redis official website and installation and installation can be done according to the operating system's condition. My recent article on Introduction to Caching using Redis can also be very helpful to install Redis on a Windows machine.
Node.js: The application that is being built needs to be built on Node.js so as to use Redis. Node.js can be downloaded and installed from the official website if not already installed. My article on Getting Started with Node.js can be very helpful as a guide to installing Node.js.
NB: This does not mean that Redis can only run on Node.js applications.
Redis client library: A Redis client library for Node.js is needed to connect to the Redis server and perform operations. For this article, we will need the
redislibrary.Networking: The Node.js application and the Redis server must be able to connect to each other.
Knowledge of Redis: Familiarity with how Redis works and the different data types it supports will be beneficial for effectively using it in the application. Check out my recent article on Introduction to Caching Using Redis. In this article, I took out time to give a beginner's guide to Redis.
Thunder Client: This is a lightweight Rest API client extension for VS Code. This is used for making API requests. To download this extension, head to the Extensions tab of the VS Code and input "thunder client" and click download. After downloading, the Thunder Client symbol should show on the "Activity bar"

Setting up the Node.js server
In this project, we are going to set up a basic Node.js application to get the number of public repositories from a GitHub username. We will start by creating an Express server and installing all the dependencies we will need.
First, create the folder
$ mkdir github_repoNavigate into the directory
$ cd github_repoCreate the
package.jsonfile which initializes the Node.js projectNB: The
-yoption is a flag that tellsnpm initto use the default values for all prompts, without requiring the user input.$ npm init -yAfter running the command above, the folders should be structured in this way:
 |
 |------ package.json
And the following on the command line and in the
package.jsonfile:Wrote to C:\path\to\package.json { "name": "github_repo", "version": "1.0.0", "description": "", "main": "index.js", "scripts": { "test": "echo \"Error: no test specified\" && exit 1" }, "keywords": [], "author": "", "license": "ISC" }For us to use the nodemon package, we will have to change the value of the
scriptsvalue to{ ..... "scripts": { "start": "node index.js" } ...... }Next, we will install the following packages:
express: for creating web serversaxios: for making requests to API endpointsredis: a Redis client library for making connections to the Redis server.nodemon: allows for restarting of the Node.js server when there is a change in the source code.cors: allows for cross-origin requests between applications
Install all the packages:
$ npm install express redis axios cors nodemonCreate the
index.jsfile in thegithub_repofolder. The new folder structure becomes:| |----- index.js |----- package.jsonWrite the following code into the
index.jsonfile to create the serverconst express = require("express"); const cors = require("cors"); // enable cors app.use(cors()); app.options("*", cors()); // parse json request body app.use(express.json()); app.use(5000, () => { console.log("Listening to port 5000") });The code above defines a simple Express.js application that uses Express and CORS (Cross-Origin Resource Sharing) modules.
const express = require("express");imports the Express.js module, which provides the main functionality for the application.const cors = require(cors);imports the CORS module, which allows the application to handle cross-origin requests.app.use(cors());enables CORS for the application. This line of code allows the application to accept requests from different origins.app.options("*", cors());this line of code allows the application to handle preflight requests from different origins, this is important for some kind of methods like PUT and DELETE that needs extra step before being executed.app.use(express.json());parses the request body as JSON and makes it available as an object in the request. This allows the application to handle JSON data in the request body.app.use(5000, () => { console.log("Listen to port 5000") });starts listening on port 5000, this line tells the application to listen for incoming requests on port 5000.
Save the file.
Run the
index.jsfile using thenodemoncommand to start the server$ nodemon index.jsAfter running this, the following code will be outputted on the command line:
 [nodemon] restarting due to changes...
 [nodemon] restarting due to changes...
 [nodemon] starting `node start index.js`...
 Listening to port 5000
This output confirms that the server has been created already and that it is running on port
5000.
Retrieving data from an API endpoint without caching
In this project, we are going to retrieve the number of public_repos a GitHub user has. We are going to use the GitHub API. This API retrieves some information on the requested user.
Here is a sample code that retrieves the number of public_repos a user has:
/*
const express = require("express");
const cors = require("cors");

// enable cors
app.use(cors());
app.options("*", cors());

// parse json request body
app.use(express.json());
*/

app.get('/without/:username', async (req, res) => {
    const username = req.params.username;
    let data = await axios.get(`https://api.github.com/users/${username}`);
    console.log("Request sent to the API");
    data = data.data.public_repos;
    res.status(200).json(data);
});
This code is a route handler for an Express.js web application. When a GET request is made to the route 'without/:username', the function inside the route handler is executed.
The first line of the function,
const username = req.params.username;extracts the value of theusernameparameter from the request's URL.The next line uses the
axioslibrary to make GET requests to the GitHub API, in passing theusernamevariable as part of the URLhttps://api.github.com/users${username}. The response from the API is stored in thedatavariable.The
console.log("Request sent to the API")is an indicator to tell us that the request has been sent to the APIThe next line sets the
datato the public repository count by usingdata = data.data.public_repos;Finally, it sets the response status to 200 and sends the data as a JSON object in the response using
res.status(200).json(data);
Now save the file and move to the command line to run the application
For us to run this application, we run the command on the command line:
$ nodemon start
We should have the following output:
[nodemon] 2.0.19
[nodemon] to restart at any time, enter `rs`
[nodemon] watching path(s): *.*
[nodemon] watching extensions: js,mjs,json
[nodemon] starting `node start index.js`
Listening to port 5000
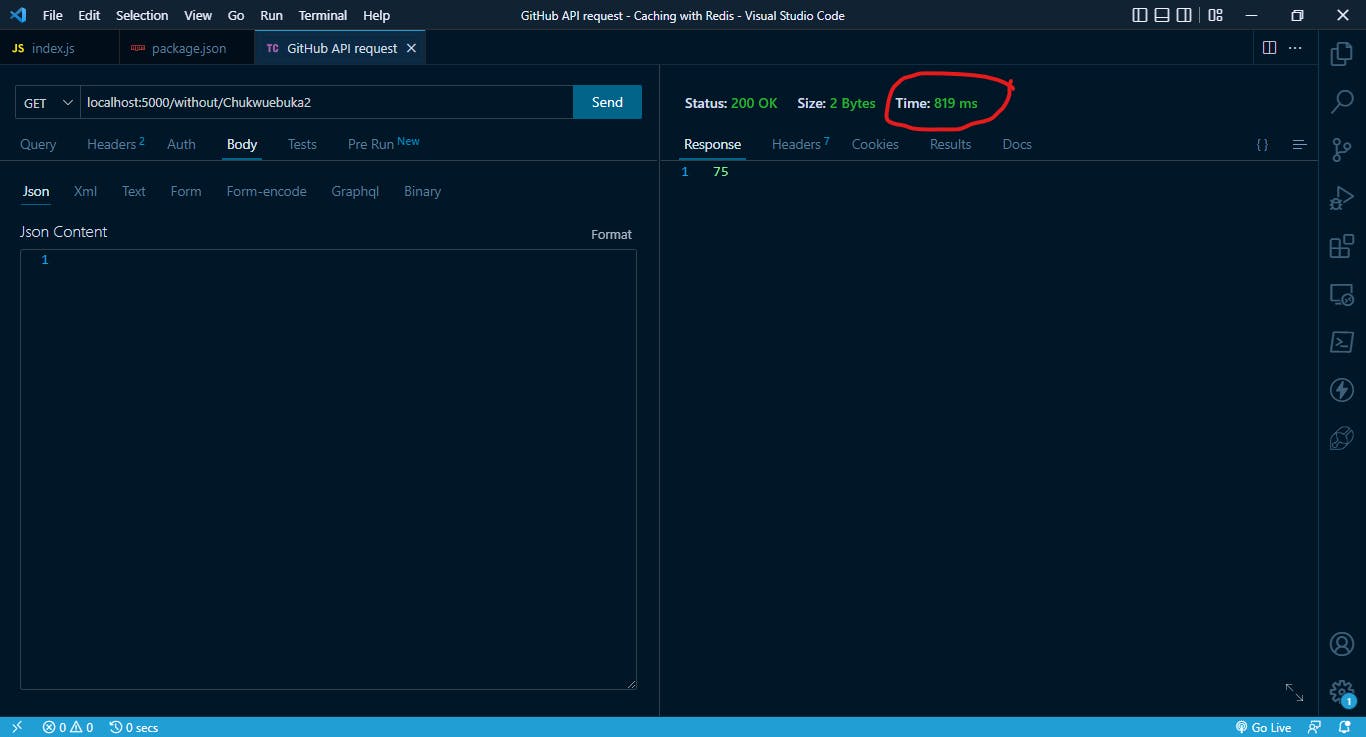
When we use the Thunder Client to send a GET request, we can see that it takes 819 ms to get a response from the server.
If we continue to make this request, our command-line output will look like this:
Listening to port 5000
Request gotten from API
Request gotten from API
Request gotten from API
From the above example, we can see that it takes about 819 ms for us to get a response from the server. With the help of caching, we can reduce the latency. We will illustrate this in the next section.
Using Redis to cache API responses
From the previous section, we have shown that it will take approximately the same time to get the same response when we make requests to the same endpoint. But with the help of caching, we will only need to make the request to the API once, and the subsequent request will get a response from the cache.
This has helped reduce the latency of the system and hence increase performance.
Let's see how we implement caching in our application.
// importong express
const express = require('express');

// importing cors
const cors = require('cors');

// importing axios
const axios = require('axios');

// importing redis
const redis = require("redis");

const app = express();

// for reading values in .env files
require('dotenv').config()


const PORT = process.env.APP_PORT;

// enable cors
app.use(cors());
app.options('*', cors());

// parse json request body
app.use(express.json());

// parse urlencoded request body
app.use(express.urlencoded({ extended: true }));

const EXPIRATION_TIME = 3600; // seconds


let client;

const createRedisClient = async () => {

    // create a client connection
    client = redis.createClient();

    // on the connection
    client.on("connect", () => console.log("Connected to Redis"));

    await client.connect();
}

//  run the function
createRedisClient();


// getting the data from the api without caching
app.get('/with/:username', async (req, res) => {
    // Get the username from the params
    const username = req.params.username;

    // checking if the username exist alraedy in the Redis database
    const getName = await client.get(`username=${username}`);

    // declaring the data variable to send the response back to the user
    let data;

    if (getName) {
        data = getName;
        console.log("Request gotten from cache");
    } else {
        data = await axios.get(`https://api.github.com/users/${username}`);
        data = data.data.public_repos;

        await client.set(`username=${username}`, JSON.stringify(data));
    }
    res.status(200).json(data);
});

app.get('/without/:username', async (req, res) => {
    const username = req.params.username;
    let data = await axios.get(`https://api.github.com/users/${username}`);
    console.log("Request gotten from API");
    data = data.data.public_repos;
    res.status(200).json(data);
});

app.listen(PORT || 5000, () => {
    console.log(`Listening to port ${PORT}`);
});
The code snippet above is creating a Redis client connection, and uses it to retrieve and store data in a Redis database.
const redis = require("redis");imports the Redis module, which provides the main functionality for working with a Redis database.let client;created an empty client variable.const createRedisClient = async () => {...}defines an asynchronous function that creates a Redis client connection.client = redis.createClient();creates a new Redis client by calling thecreateClient()method provided by the Redis module.client.on("connect", () => console.log("Connected to Redis"));listens for a 'connect event', which is emitted. It logs a message to the console indicating that the client is connected.await client.connect();connects to the Redis server, this is important as we'll need to connect to the server before we can start working with the Redis database.createRedisClient();runs the function to create the Redis client.app.get('/with/:username', async (req, res) => {...})defines the route that listens for GET requests to the '/with/:username' endpoint.const username = req.params.usernme;creates a variableusernamethat contains the value of theusernameparameter in the route path.const getName = await client.get(`username=${username}`);uses theclient.get()method to check if theusernamealready exists in the Redis database. If it does, it sets the value of thedatavariable to the value of thegetNamevariable (which is the data retrieved from the Redis database).else {...}if theusernamedosen't exists in the Redis database, it makes a GET request to the GitHub API to retrieve information about the user specified by theusernamevariable. Theawaitkeyword is used to wait for the promise returned by theaxios.get()method to resolve before continuing with the rest of the code.await client.set(`username=${username}`, JSON.stringify(data));stores the data retrieved from the API call in the Redis
Now let's save and run gain.
$ nodemon start
Now we are going to make a request to get the number of public_repos from Aphatheology using our Thunder Client:
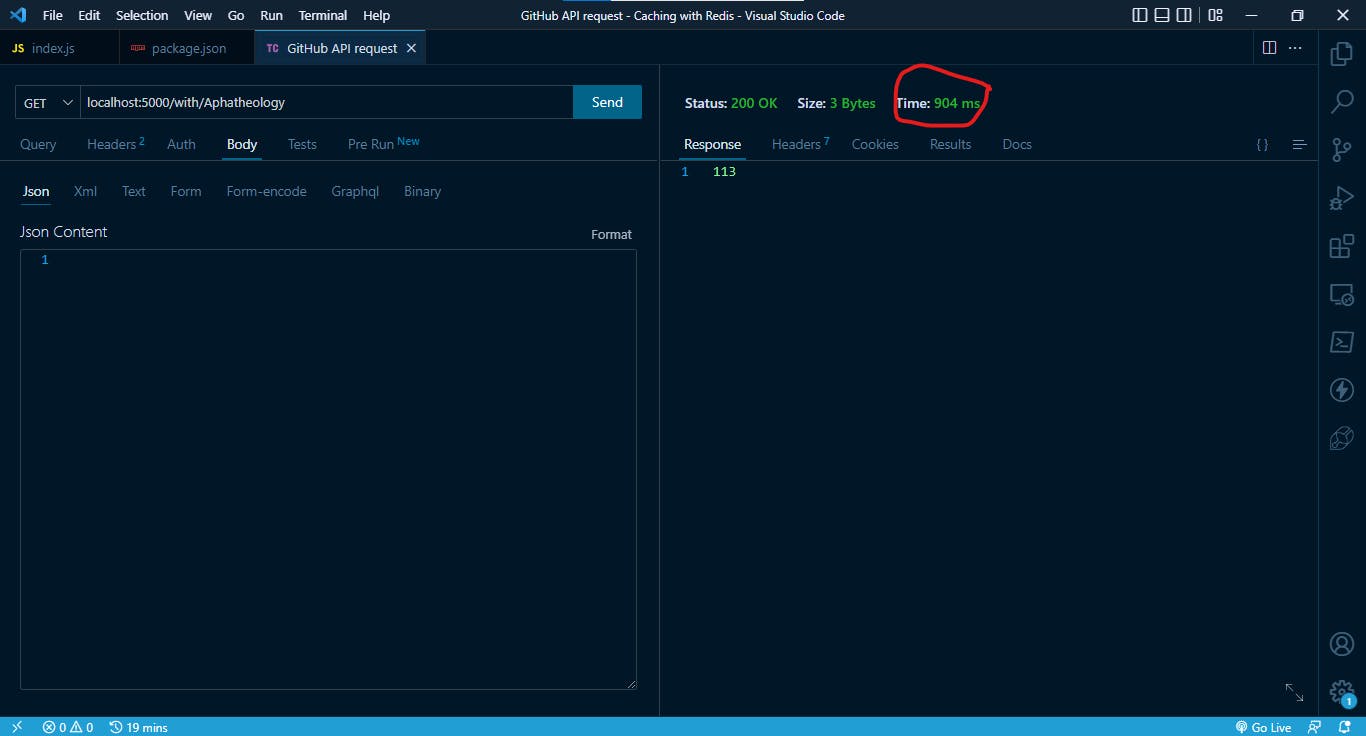
This was the first response that was gotten from the server. This took almost the same time it took for the other requests. But if we continue to make this request over and over again we will see that the latency has reduced.
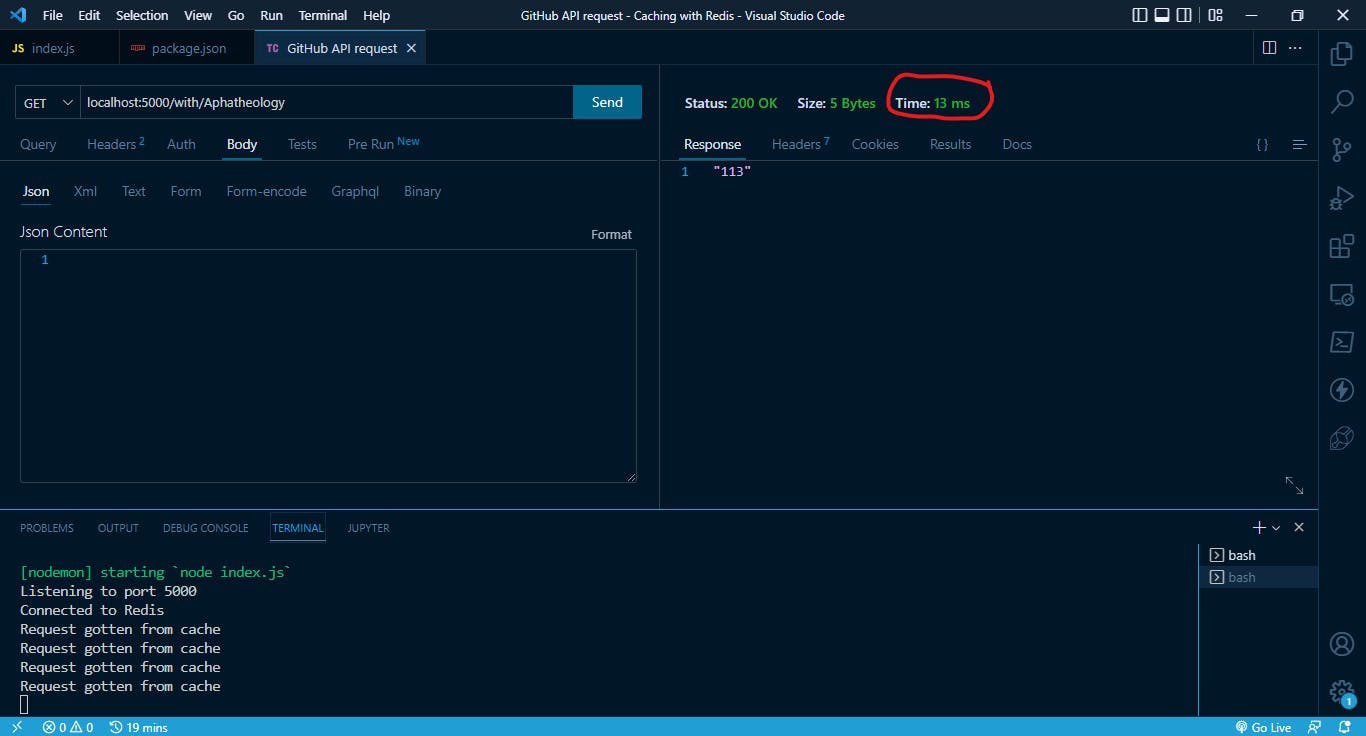
We can see that this took less time to fetch the request at about 13 ms. This is a great improvement and will go a long way to improving the performance of our system.
We can load the redis-cli on the command-line and using the KEYS * to see all the key names we have:
$ redis-cli
127.0.0.1:6379> KEYS *
1) "username=OffiongJoy"
2) "username=Chukwuebuka2"
3) "username=Aphatheology"
4) "person"
127.0.0.1:6379>
Managing caching experience and eviction policies in Redis
Redis allows us to manage cache expiration and eviction policies in several ways:
Time-to-Live (TTL): we can set a TTL value on a key when we add it to the Redis cache. Once the key expires, Redis will automatically delete it. We can set the TTL value in seconds, milliseconds, minutes, hours, or days.
maxmemory-policy: Redis allows us to set the maxmemory-policy configuration option to specify how it should handle eviction when the memory limit is reached. The available options are "
volatile-lru", "volatile-ttl", "volatile-random", "allkeys-lru", "allkeys-random", "noeviction"Access Frequency: We can use the Redis command 'accessed' to update the access time of a key, this way we can use the LRU (Least Recently Used) algorithm to decide which keys to evict.
manual eviction: We can use the Redis command '
del' to manually delete keys from the cache.Memory-limit: We can set a memory-limit to our Redis server, this way it will automatically start to evict keys when it reaches the limit.
Redis allows us to use different eviction policies for different types of data, for example, we can set an LRU policy for keys that are stored in a specific namespace, and set a FIFO policy for keys stored in another namespace.
Redis also allows us to set a maxmemory-samples option, which controls how many samples are taken to calculate.
Conclusion
In conclusion, implementing a cache in Node.js using Redis can greatly improve the performance of our application by reducing the number of requests to the database and increasing the speed of data retrieval. Redis, a popular in-memory data store, is well suited for caching due to its high performance, scalability, and support for a wide range of data structures. By using Redis in conjunction with Node.js, developers can easily create a powerful caching system that can handle high traffic and large amounts of data. Overall, implementing a cache using Redis and Node.js is a valuable optimization technique that can help to improve the overall performance and user experience of our application.
Thanks for reading 🙏🙏.
Follow me on the following platforms:
Twitter 🐦: @nwokporo_ebuka
LinkedIn ⚡: @chukwuebuka_nwokporo
GitHub 🚀: @ebukvick
Hashnode 📗: Nwokporo Chukwuebuka